Passionaltycrafty

Monday, July 30, 2012

We Teach! at Jo-Anns!

For those of you who don't know about it, We hold many different classes at Jo-Anns Fabric & Crafts. Sewing, Cake decorating, Quilting, Knit & Crochet, Jewelry-Making, Painting, Papercrafting, and more. We also have some kids' classes. I got the new class catalog in and we still have some August catalogs left. Come in and take a look at the samples for projects in the different classes. August 11th is "Open House" at any of the Jo-Anns and you can sign up for all the dates you want for 50% off!!

One of my favorite classes to teach is the "Cricut Workshop" it is a 2 hour class where I instruct you on how to use your Cricut Expressions (The original Expressions) and all the buttons and bells.

Did you know that you can book a party at Jo-Anns? We provide: crafts for your guests to create. The space to hold your party,  the party host. We will also provide sprinkles and decorations for your guest to decorate their own cupcakes. Time for opening gifts, craft creation, cupcake decoration. etc. (You provide: cupcakes, paper goods, drinks, gift bags if desired). Call or come in for information on parties and to check out our new Education classroom. Ask for Marye or Juliana in Education.

July 's "Craft & Crop" was a hudge success!


"Craft & Crop" was a huge success. We had 11 ladies attend. Each received the "Vacation Time" scrapbook kit, "Glitter & Shine" Card, the Birdie Gift card kits, and the "Layered Felt Flowers kits. They brought projects of their own to work on and used our Cricut machines and cartridges to cut what ever they needed. One of the cool things is they can shop when the store closes, no lines now rush. Most of the ladies brought a dish or snack of some kind and copies of their reciepes for others to take home. We have 7 signed up for the August class already! So if you would like to attend  August 28th, you need to call or come in to Jo-Anns in Hurst and register. I have only 11 spaces available each month.

Friday, July 27, 2012

Cricut Cartridges Need A Home!

I have sold 5 so here are the ones I have left.
I have some cartridges that have been sitting in my craft room for 2 years now. I have my own and need to find a home for these. These are all new, except one that I use a couple of times for a demo (Wall Decor and More). I paid $25 for each of them and would offer them to any interested party for the same price. If you need one shipped, you will have to pay shipping. If you live close you can pick them up (Cash), if you need to have them shipped. I can create an invoice for you through my Paypal account. First come first serve. Here is a list of what I have. This is all and when they are gone there are no more. Please email me at mebdbird@yahoo.com with your choice and your shipping information if needed or questions.
Marye Bird
passionatlycrafty.blogspot.com


Animal KingdomDisney/Cars
Come True
 
Winnie the Pooh and Friends

 
Destinations


Home Decor and More


Tuesday, July 24, 2012

Birdie Gift Bags

This is a fun craft because you don't need any special tools or machine to do them. You have a pattern for the bag & The band. Cut them out using contransting card stock.

Here is what I chose. This would be a great way to use up some of the scraps you have saved.
You can use any large punch thay you have on hand. I used a large Fisker punch "A Little Birdie Told Me" .

Next you need to use your pattern and mark the places you have to score. I used my Martha Stewart Scoring board (I LOVE THIS TOOL!) If you don't have a scoring tool of some kind, you can use a scoring knife and a ruler.


Score both the bag and the strap as shown


Fold where you have score lines. Fold like fan shape on each side so you will end up with that inward crease like a paper bag has.

The bag should look simular to this when you glue it together.


Now you can glue the band around the center of your bag as I have done. The ends should be in the back side of your bag.

Now take your Bird or what ever shape you choose and use a foam square to attach to the center of your band on the front of your bag. This will give the design some cool 3-demensional look. Then I took some flowers cut with my Cricut and Plantin Schoolbook cartridge at 1 1/4 inches and used another foam square. You can use any flower punch small enough to fit in the center of you central shape (Mine was Fisker punch "A Little Birdie Told Me" ).


I also cut some 3/4 inch circles with the same cartridge and used adhisive dots to attach the buttom to the circle and then the circle to the flower. You can use a circle punch.


Here is what the finiched project looks like.

I loved making these. Thanks goes out to Valerie Salmon of Fiskars, Inc. For the pattern. They are just too cute! And you know you can use what ever theme you want and create these for any occasion. Hope you enjoyed this.
Marye Bird
passionatlycrafty.blogspot.com

July 28 is the Big Day!

The next "Craft & Crop" night at Jo-Anns will be July 28. I have limited spots. So if you want to join in on the fun, get signed up! For $20 each person who attends will receive the ("Vacation Time" a 2 page 12X12 scrapbook kit). And three other crafts. (Birthday Card "Glitter & Shine"), (Layered Felt Flowers) and(Gift bags) shown here on my blog. We will have a great time as usual. Some of the ladies are bringing their favorite dishes along with copies of their recipes for you to take home. We will have Cricut machines and lots of cartridges for you to use. You will have use of all crafting equipment in the Education room. We have drawings every 20 minutes. The store closes at 9 but we get to stay. No lines for shopping. And you can bring anything you would like to work on. We have so much fun. Hope to see you there. Oh, you can call in to Jo-Anns' and enroll over the phone or come into the store. What ever is better for you. See you there "-)

Sunday, July 22, 2012

Do You Love To Knit?


If you love to knit and would like to share that talent with others and get paid for it too, I am looking for a person to instruct Knitting classes at Jo-Anns Fabric and Crafts at the Hurst Store. The Instructor receives 60% of each sign up. If you can read a pattern and instruct a person on how to make and use the different knitting stiches and love people you are the person I am looking for. There will also be a kids' knitting class from time to time, so you must be good with children. You can also create classes that you want to do as well as the classes that we require. You choose the dates and times you perfer. Call or come in to Jo-Anns Mon, Tues, Weds. Fri. or Sat. between 11:00-3:00 ask for Marye Bird in Education. Or call 817-595-5842

Wednesday, July 18, 2012

Layered Felt Flowers

I found this "Layered Felt Flowers" on Pintrest and fell in love with it. I would love to give credit to Kara Cook over at creationsbykara.com. You can go there and print the free pattern. It is cute, vesitile, inexpensive and easy to create. For those of you who work with children, this is a great craft. You can make hair excessories using clips and such, hot glue it to a head band, put a pin on it and at it to a sweater, hat ect. You could even use it in many crafts, the choices are endless.


Supplies:
-Free downloadable pattern
-Felt or fabric scraps
-Sharp scissors
-Needle and thread
-Embellishments
-Alligator hair clip
-Hot glue gun

Instructions:  Use your free pattern to cut out the nine circles.


Cut the slits around each of the circles.


Then to the left of each slit cut up to the end of the slit. so you have a space between each petal.


Then layer the circles on top of each other largest first. Once you have them layered take a threaded needle and go up through the center of your stack and back down a couple of times making it as tight as you can.  Make a knot and cut thread.
Now you can add an embellishment (I used a plastic rinestone) and attach with hot glue.

Cut 2 green felt leaves (there is no pattern, create your own) Turn the flower over and hot glue to the back side of the flower.


Cut a circle (I used one of the circle patterns) and hot glue it over the leaves . Then you can attach what ever clips and such to the back using hot glue. And there you have it! It is so cute and fast and easy. You can do so many things with them. Hair accessories (clips headbands and such), You could use pins instead of clips and pin them to a blouse, sweater or jacket. I love it!

Marye Bird
passionatlycrafty.blogspot.com


Saturday, July 14, 2012

"Glitter & Shine" DT#2

"Glitter & Shine"
Since I created "Vacation Time" scrapbook pages for my last project, I decided to create a card for this times project "Glitter & Shine".


I wanted to share a new type of Cricut cartridge called "Events". They are in a box like the original cartridges but have only 50 cuts like the seasonal cartridges. This on is great! The name of the one I am using is called "Baby Shower" It has some really cute and cool cuts on it. You can create anything you could need to plan a baby show. You can use a lot of them and change the theme even. There are some cards, boxes and more.

I started off using Die Cut With a View (DCWV) "Spring Fling Stack", to cut the card. It is a shimmer paper. On page 12 you will find the card. I cut <Card1> at 4 1/4 inches. (I love this card).


The next layer is on the same page directly below the card and I cut it at <Card1Lr1> at 4 1/2 inches using the silver glitter paper from DCWV Glitter pack, next, I cut it again at 4 1/4 inches with paper from EKsuccess/Martha Stewart "Happy Birthday" pack. I layered them using foam squares. Next I cut the cupcakes and word "Party" from another page out of  EKsuccess/Martha Stewart "Happy Birthday" pack and the pink glitter paper came from there also. I framed the work party using all three colors and did the same for the cupcakes. I used a corner punch for the cupcakes. I used foam squares for the cupcakes and glued them to the card.

I used foam squares for the green layer on the word "Party" and in between silver and patterned layer on the base card. This is a good example of using this "Events" cartridge for a variety of events.
I had fun trying a new cartridge and all these different papers and it gave me a chance to share something with you again. I am truly blessed to be a part of Just-a-scrappin Design Team. Thanks again
Marye Bird
passionatlycrafty.blogspot.com
Just-a-scrappin Design Team #2

Friday, July 6, 2012

"Vacation Time"


OK Ladies, here it is "Vacation Time" I used one of my favorite Cricut Cartridges "Life's A Beach" I started with page 44 and cut the sun at 3 inches, then cut the sun again using the layers button and same size.

Next I took brown paper and ripped across the sheet at around 2 1/2 inches to create the beach and cut another brown piece to make the hill for the light house. I cut the seagulls at 4 inches.  The larger umbrella was cut at 4 inches with white paper and again using the layers button and green paper. The pail and the beach ball were done in white at 1 inch and then again with the gray layers button in in green.


Next I went to page 79 and cut the light house at 8 inches. Use black paper to cut the regular cut, then changed to white paper and pushed repeat last. I used the black as the frame of the light house and took the scrap pieces from the white light house and glued them in the empty spaces as shown. Then I used Blue paper and cut using the layers button and added them.


 To create the Scripture. (Psalms 139: 17-18) I printed it on white card stock added the cute little crab icon and cut it into a square shape the size I wanted, then I framed it in dark green, again in blue, then in white, and last in light green. And there you have it.

The frames were a little tricky. I cut the picture frame on page 45 and cut the back side off. I framed each one with blue and then used some scrap left over from some blue waves I cut from another project. I just added them to the bottom of the white picture frame.


I used the font cartridge "Jubilee Celebration" and cut the letters regular at 1 1/4 in orange , then again with the shadow button and green paper, after layer them, I glued them to white pieces of card stock and cut squares around them , then framed them with blue scraps  They were attached using foam squares.


The lifeguard chair was cut at 4" in white and again using the layers button and green paper. I cut layers a second time with blue to get the blue for the umbrella at the top of the chair. The round float was cut from white paper at 1" and I used acid free blue ink to detail it. The crab was cut at 1 1/4 inches

So there you have it.
Marye Bird
Just-a-scrappin Second Design Team
passionatlycrafty.blogspot.com

Wednesday, July 4, 2012

New From EKsuccess Brands Inkadinkado "Stamping Gear"

This is the Inkadinkado "Stamping Gear". I was sent one to try it out and it was really fun!

When you open it up you will find: a stamp pad to attach rubber stamp to so you can use it, 4 decorative stamps, the cog and an instruction folder.

This is the stamp pad that you place the rubber stamps on.

This is the cog, if you look at the plastic stamp holder you can see that it has a little arm that sticks out at each end and you fit them into the little sections on the cog and work your way around to make your pattern.

Here are the four rubber stamps that come with the "Stamping Gear" kit.

Here I have placed a rubber stamp on the plastic pad.

Here is a view from the other side.

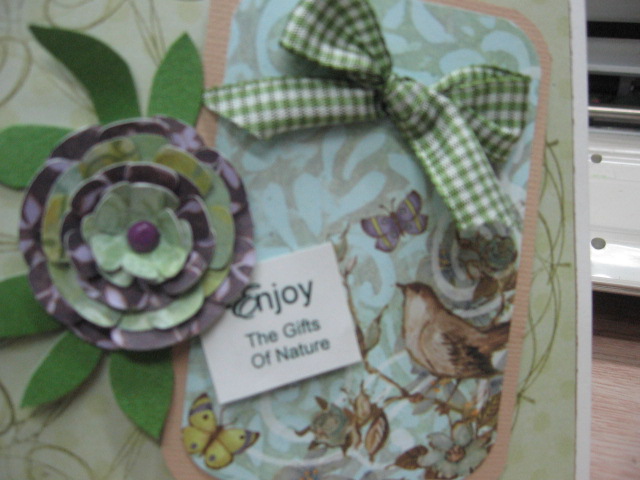
Here is the completed card after using the "Stamping Gear" tool from EKsuccess. It is so sweet!


I did not have the K&Company Embelishment called for so I used K&Company "Susan Winget" mat pad and my Cricut Die cutting machine with Plantin Schoolbook cartridge to cut multple flowers at different sizes to make one simular.


The tag here was also cut from her same mat pad and I framed it with Tan cardstock. I added the phrase and a cute bow.

Here are the instructions:
I cut white cardstock to measure 5 1/2 X4 1/2 inches for the card base. Then I cut a pok-a-doted patterned piece of cardstock 5 1/4 X4 inches and inked the edges with brown ink. Using "Stamping Gear" I applied one basic stamp with dark green ink, making my way around the cog stamping every notch. I used K&Company "Susan Winget Mat Pad" for the tag and framed it with tan cardstock. I used two different pages of her same mat pad and my die cut machine to cut the multi size flowers that I layered on top of each other and fluffed to make it really stand out. I then added the bow and the phrase. This is an example of, when you don't have K&Company embellishments, you can take any K&Company paper and make your own. This was a fun tool. Thank you for asking me to try it.
Thank you Tara Van Der Hey for sending me this fun tool to try out and share.

Marye Bird
passionatlycrafty.blogspot.com