Passionaltycrafty

Friday, October 19, 2012

#2 Craft for Octorber "Craft & Crop"

I was looking for something for a ladies event at church and I found an adorable box.
I could not copy it because I did not have the cartridge that was used. The box came from one of my favorite blogs. "Above Rubies Studios". Here is a perfect example of improvising.
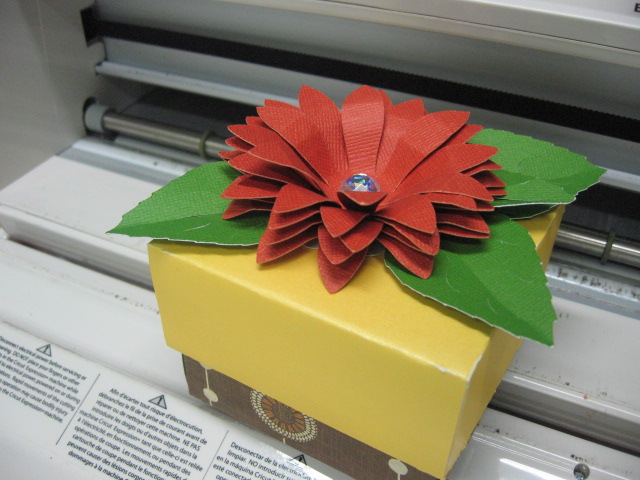
 
 
I used Cricut Cartridge "Bridal Shower" Events and cut the bottom and the top of the box at 11".
 
 
I love this cartridge!
It's not just for Baby Showers!
 
 
Set your machine for 11 inches, make sure you do the top at the same size.
 
Next I used "Flower Shoppe" Projects cartridge and cut the flowers.  This cartridge has a variety of Flowers you can create. 
 
Here is a sample done in what for testing the size. You want to cut 9 Flowers of your choice at 3 1/2 inches. If you use a 12X12 piece of card stock you can use the button (Auto Fill) and it will cut 9 for you.
 
Then you will layer them on top of each other


This is what it will look like. Then take each petal and curl it with your fingernail
Then I took cartridge "A Child's Year" on page 37 are the leaves I cut 3 at 2 3/4 and 1 at 2 inches. If you don't have these cartridges take a look at the ones you have and see what can be used instead.
 
Than attach your leaves and this is what you get. You can can pinch the tips and make then look 3-D for a more natural look.


The finished project is so cute. You can make tags for them, add ribbon or bows. Thanks to "Above Rubies Studios" for the inspiration.
Marye Bird
passionatlycrafty.blog.spot.com


Tuesday, October 16, 2012

"Craft & Crop" Night Craft #1

I am sponsoring a table at a function at church and the theme is Thanksgiving. I created these napkin holders for a setting of 8 using flowers left over from the centerpiece I also created. You know how I love to use recycled materials when ever I can. It saves me money, and there is less going into the land fills. Here I took a paper towel roll and cut it into 8 rings.


Then I covered them with a fall themed 1/12 inch ribbon (found at Jo-Ann's Fabric and Crafts on Clearance) inside and out. I used a hot glue gun to attach the ribbon to the ring, folding the end of the ribbon under to give it a clean look.


Here you can see the ribbon I chose and the finished napkin holder.

Since the centerpiece will be on a round table I added a bow to both sides. I used the smaller orange and yellow sunflower style flowers left over, cut them almost flat and hot glued them to my napkin holders then I took the sprigs of long leaves on them and cut them down into small leaves and added them to the napkin holders also. You can make these rings for any occasion. This was so much fun to make and they are beautiful.
Hope you liked them too.
Marye Bird
passionatlycrafty.blogspot.com
 

Monday, October 15, 2012

"Craft & Crop" October Free Pages

Here is the pages I created for the ladies who attend Octobers "Craft & Crop" night at Jo-Anns on Oct. 27. We have so much fun. It runs from 6:00pm to 12 Midnight. We get to stay after closing and shop with no lines, try the dishes the ladies bring and have drawings every 20 min or so. We have Cricut machines and I bring my personal Cartridges along with the ones in the Educational Classroom and those who attend can use them till their hearts content. We will also be doing three Crafts that the ladies can take home and re-make for school, church or just when you have a few girls over for fun. Come and join us. The seats are limited so sign up soon. You can sign up over the phone too.


Hope you like it!
Marye Bird
passionatlycrafty.blogspot.com


Tuesday, September 18, 2012

September Craft & Crop at Jo-Anns!!

Along with the Halloween two page scrapbook page I have posted below, each person who attends will get to create this cute Halloween envelope. You can fit a candy bar in it and pass them out to the kids at school, you Girl Scout troop or friends at a party, even at work. They are very simple to create.
 

I took the template created by Valerie Salmon of Fiskars, Inc. and cut the envelope out of Halloween paper I had from last year. I purchased it from Tuesday Morning. Did you now you can get some really cool paper and paper packs from their stores? Then you fold on the lines and I used my Scotch Advance Tape glider (glue runner) to glue it closed except the top flap.


I used a scalloped punch and orange card stock, then cut around a pumpkin from a scrap piece of Halloween paper and centered it on the scallop using a foam square. I cut a piece of green paper slightly smaller then the front of the envelope and centered it to the front of the card. I then cut some Halloween words and framed them a couple of times and used foam squares to attach them to the front of the envelope along with the pumpkin.
I hope you will join up September 22 from 6-Midnight with some other fun crafts food drawings and lots of fun and food.
Marye Bird
passionatlycrafty.blogspot.com

September 18th Design Team Project "Sympathy"


Just-a-scrappin has asked the Design Team to create a project with the theme of "Sympathy" using a gate Fold Card and a punch. I used my favorite Martha Stewart punch to trim my card. I used another Fiskar corner punch on the frame of the Bird House that was created with my Cricut Cartridge "Cindy Loo".


 Inside the gate fold card I printed with my computer part of a verse from the Bible, John 11:23-26 and framed it a couple of times with coordinating card stock and left room below that to sign the card.


Here are the directions.
Cut an 8 1/2X5 1/2 piece of card stock for the card base. I used my Martha Stewart Score board and scored it at 2 1/8and again at  6 3/8. Fold at both score marks to center of card. Using "Cindy Loo" Cricut cartridge, cut all 3 layers of Bird House at 3 inches and glue them on top of each other, then glue the bird house in center of frames as shown above. I attached the framed birdhouse to the left lower portion of the card with foam squares being careful not to attach the right side so you can open the gate. I printed the quote and framed it too. Again using foam squares to attach only the left side so you can still open the card. On the inside I attached the frame with the verse at the top portion of the inside of the card leaving room at the bottom for signatures. I hope you enjoy this card.
Marye Bird
passionatlycrafty.blogspot.com

Friday, September 14, 2012

September Craft & Crop at Jo-Anns in Hurst


Here is our "Craft & Crop" page for September 
You will be ready for those cute photos of the kids or grandkids after they have had their Halloween fun.


I have used the Cricut cartridge "Mini Monsters" for all of the cuts for this set of pages.


It has some really fun cuts. If you have not seen it take a look. I love the haunted house.


I hope you enjoy this one. If you are interested in Craft & Crop remember sits are limited so sign up as soon as you can. You can even call the store and sign up over the phone. It is scheduled for September 22, 6-Midnight. In our new Educations Room at the back of the store. You can bring a dish if you like. And a copy of your recipe to pass out. Hope to see you there!
Marye Bird
passionatlycrafty.blogspot.com


Thursday, September 13, 2012

September 11th Design Team Project "Volleyball"


I started with a Maroon card base cut at 8 1/2X5 ½. Next I cut a piece of patterned paper from EKsuccess
And cut it 4X5 ¼ and centered it on the card, next I used a gold piece of Embossed Specialty Paper from an EKsuccess pack and cut it 3 3/4X4 ¼ and centered it on previous layer on the card. Then I used my Cricut Expressions and Sports Mania cartridge. Page 43 using gray button “Borders” at 1 ¼ for the volleyballs and then again at  1 ¼  pushed shift and regular cut to get the “I dig VB”. I framed the Volleyball border with Maroon, then larger with white. I used foam squares to attach it to the left side leaving ¼ inch from side. And then framed the words separately in patterned paper and larger in maroon paper and attached them as shown above.


I added a maroon bow to the top corner with a small brad. Then I added some gems .
Hope you like it. "-)
Marye Bird
passionatlycrafty.blogspot.com