Passionaltycrafty

Wednesday, March 14, 2018

Craft & Crop at the Bird House for March

This project is for Easter Decor, my friend showed it to me. I loved making it and the sweet thing about it is that you can change it each month for the next holiday! So each month for the next 11 month, You will be creating a new set for another month. We will start out with wooden blocks. I purchased a 2X4 board from Home Depot and cut 2 of each at 6 inches, 5 inches and 4 inches. Then I made Modge Podge by mixing 1 cup of Elmers glue and 1/4 cut of water in a jar and shake till mixed. I ripped up the pages of a book and Modge Podged each piece and placed it on the wooden blocks. Let dry. Then I worked on the decorations that will hang on each block. Here is the finished decor for Easter Holiday.

 Here is the first block in the set. It has a sweet rabbit decorated so cute, you can see how it hangs on the front of the block of wood. I chalked the edges of each block when they were dry. I used my Cricut to cut the rabbit and some Swiss dot textured card stock. I cut the Happy Easter with my Cricut also, using textured green card stock. I purchased simple upholstery tacks. The little card is made from chip board covered with my choice of card stock. I recycle chip board from the boxes that I get when I purchase my dog food. You can use anything around the house. I love to recycle. It's the Girl Scout in me. I used ribbon I tied in a bow, googly eyes and a black button for the eyes, a little pink heart cut from my Cricut, and twine for the whiskers.
 The H in HOPPY, I cut out of glittered card stock with my Cricut and also the cute pink flower and leaves. I added a rhinestone to give it some bling.
 Those who know me know that I love the Lord and I try to incorporate something that draws me to Him. Here on the O in HOPPY I found a wonderful scripture to point us to the true meaning of Easter. I made this shape like an egg, added a sweet ribbon, a pink flower cut from the Cricut, and some flowers I had in my stash. I added some rhinestones for bling. My friend Pamela gave me the sweet purple Rhinestone flowers and I was so excited to use them.
 The first P in HOPPY, was created in the same way, just added different flower cut with my Cricut.
 The second P in HOPPY, was done in the same way. Not only are the blocks different sizes but the chip board cards are too.
 The last letter Y in HOPPY is done similar to the others.


Here is what the Modge Podged blocks will look like when you finish them.
 Then you can hang your decorated chip board cards from them to match the holiday for that month.
 I hope you will join me to create this wonderful decor for your home or to bless a sweet friend with. Don't for get to text me for a seat. 817-999-8223
Marye Bird
Passionatlycraft.blogspot.com.

Wednesday, February 7, 2018

Feb. Craft & Crop at the Bird House Craft Project

Here is the craft project we will be working on. I found this on line and tweaked it. It was a very simple project and I made it thicker so we could add more photos. So not only do you have more room between pages, you have pocket in the top of each page to put more keepsakes, or photos or you could journal about your photo and slip it in the pocket.

 Here you can see that I made it thicker. You can decorate the binding if you like. I chose not to at this time, I may change it later. This is made from wooden sticks glued to chip board and painted white with acrylic paint
 Here is a view of the front and binding.


 And a view of the finished project.


 I made you a kit with everything you see on these pages.


 Here I just fuzzy cut flowers from some of the Graphic 45 paper I used for this project and made a tuck a way to stash stuff behind.


 You can put a photo behind each of the tuck a ways on each page.

and the finished project again.
Hope you will join us for Feb. 17th Craft Night, if you would like to reserve a seat text me at 817-999-8223.
Marye Bird
passionatlycrafty.blogspot.com

Thursday, January 11, 2018

Craft project for January at "Craft & Crop at the Bird House

Here is the cutest craft for January. This is mad with three nesting hat boxes and was so much fun to do. I hope you will have a blast!

 This is the finished project. I can't wait to gift it to someone special. Or maybe keep it for may self!


 Here is what it looks like with the first lid off. you can fill it with candy for Valentines Day or some other surprise. Maybe cookies you have made. Or just give it empty and let your special friend decide what they want to put in it.


 Here is what it looks with the second lid off. You can also put a lining inside the boxes it you wish.


 Here is what it looks like with the last lid off


And back together again. I love how sweet it turned out. Hope to see you there. Remember to text if you want to reserve a seat. 817-999-8223

Marye Bird
Passionatlycrafty.blogspot.com

Thursday, December 14, 2017

December "Craft & Crop" at the Bird House

This month we will not be making a Scrapbook kit, instead we will make our usual craft and 8 Christmas Cards for you to send to friends and family. Please Text me so I can have a count for a gift I want you to have. 817-999-8223
 Here are the cards, they are created with card stock from Heidi Swapp and Echo Park designer Lori Whitlock.


Here is the a front view of the Craft we will be making. This sweet Album is crated with Graphic 45 "A Ladies Diary" card stock.


Here is the back of the album.


When you first open it this is what you will see. Belly bands on either side that holds cards for pictures or journaling.


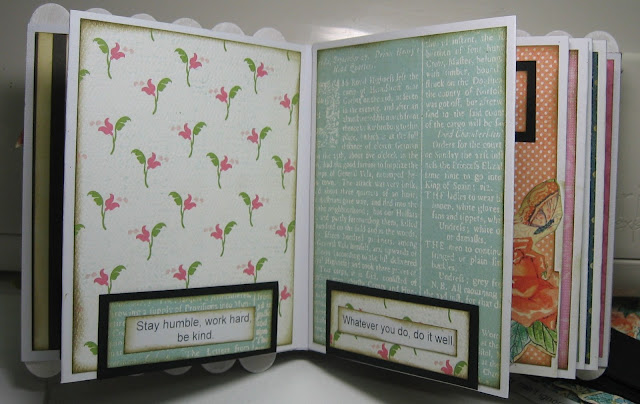
When you open further you will have pockets and places to slip more photos and even more pretty photo cards

Here is another view fully opened.


Can't wait to see you before the Christmas Holiday. Be sure to text me so I can get a count. Don't want to miss anyone for a gift. Looking forward to our time together.
Marye Bird
passionatlycrafty.blogspot.com
817-999-8223

Wednesday, November 1, 2017

October Craft & Crop at the Bird House Card Project

This is called the accordion card. Here is what it looks like from the front.


When you open it this is what you see. You can make these for any occasion.


Here is a view from the back.

October Craft & Crop at the Bird House craft project.

 I started off with a 12" wire form I purchased at Walmart for 1.77 and I chose some Christmas theme paper. You can create this wreath for any holiday or season.


 Next you will need to cut the large patterned pieces at 4 X 4 and then solid at 3 X 3

Then you will glue the 3 X 3 solid squares one on each of the larger 4 X 4 squares placing them in one corner leaving 1/4 in showing.

 You will then shape and hot glue them into cones. Once you have enough to go around the form you will fold the tip of the cone around the second wire and hot glue it in place. You will cut patterned pieces 3 X 3 and solid pieces 2 X 2 and do the same with them. When they are done fold the tip of the smaller cones over the center wire of the form and hot glue them in place. 


This is what your wreath will look like. I added medium size red bells to the center between every other cone. It came out real cute


Here is what it will look like from the back.


 And from the front.

Tuesday, September 5, 2017

September "Craft & Crop at the Bird House Card Project

I found the idea for this card when I worked at Brookdale in some really old craft stuff that was being thrown out.  It was the size of a gift card, but I decided with some tweaking, I could make a regular card from the design. I wish I could give credit to the designer, but have no idea who this person was.  


The card base for this project is an envelope. You can use any size, that will determine what the end size will be. I used an 8 3/4 X 5 3/4 envelope. I purchased these a couple of years ago from Walmart. They were boxes of wedding invitations you print your info on. They were in the clearance Isle. I saw some there a few days ago but, I still have plenty. I have used these a couple of times for projects and I paid $1.50 for 50 ct. boxes. 

Starting with the envelope I scored in on each side, then cut the sections at the left and right top of the flap just into the score mark, at a angle. then I cut 2 pieces of patterned paper in a square, and lining them up one on the bottom of flap and one on the top of flap. Then I cut one piece of white card stock into a square 1 /8 inch smaller and centered and layered it on the top. I had stamped Celebrate across it and added some rhinestones. I took the envelope and stamped here and there all over. And then cut a piece ribbon and attached to the back of the envelope making it long enough to bring around the card and tie in a bow. Now cut a piece of patterned card stock 1 /8 inch larger than the folded card and attached it. 


Next I took a piece of patterned card stock and cut it 4 X 5 and a piece of white card stock cut 1/8 smaller and stamp my sentiment on it and layer it on to the patterned piece. This will slid right into the center of the envelope. 

Now just fold in the gate fold flaps inward and fold over the top flap and tie your bow. You have a sweet card to give someone you care about. 

This was a nice way to use these envelopes. You can make it any theme you need.
Can't wait to make this with you. Sept. 16 at 6:30 pm. at my house. Remember, if you have signed up and can't make it for some unforeseen reason, please text me so I can move someone on the waiting list into your seat.  See you then!
Marye Bird
Passionatlycrafty.blogspot.com
817-999-8223